Followers

Friday 17 August 2012

Beauty is our Passion Guests:- Martina and Denise from All Things Fabulous


Hi Beauties :)

We have invited The Fabulous Team from All Things Fabulous to write a Guest Post on our blog:

How To: Ombre Nails

Hi Guys!

I hope you are all well! We would like to thank Jessica and Rachel for hosting us on their blog today!!

We have a very interesting post for you today!! Have you ever heard of Ombre/ Gradient nails? Well we are going to show you how to do glittery ombre nails!!

This type of nail art gives the illusion that the colours used merge into one another as if it is all one nail colour!

Products Used:


  • Essence Nail Polish Remover (Strawberry + Vanilla)
  • OPI 180 edge nail filer
  • Essence Colour & Go Nail polish in 108 Ultimate Pink
  • Essence Remix your Style Limited Edition Nail Polish in 01 Just Can’t get enough
  • Essence Colour & Go 144 Black is Back
  • Essence Marble Mania Limited Edition Nail art kit (sponges + stripers)
  •  Sally Hansen Diamond Shine base and top coat
  • Plastic Surface


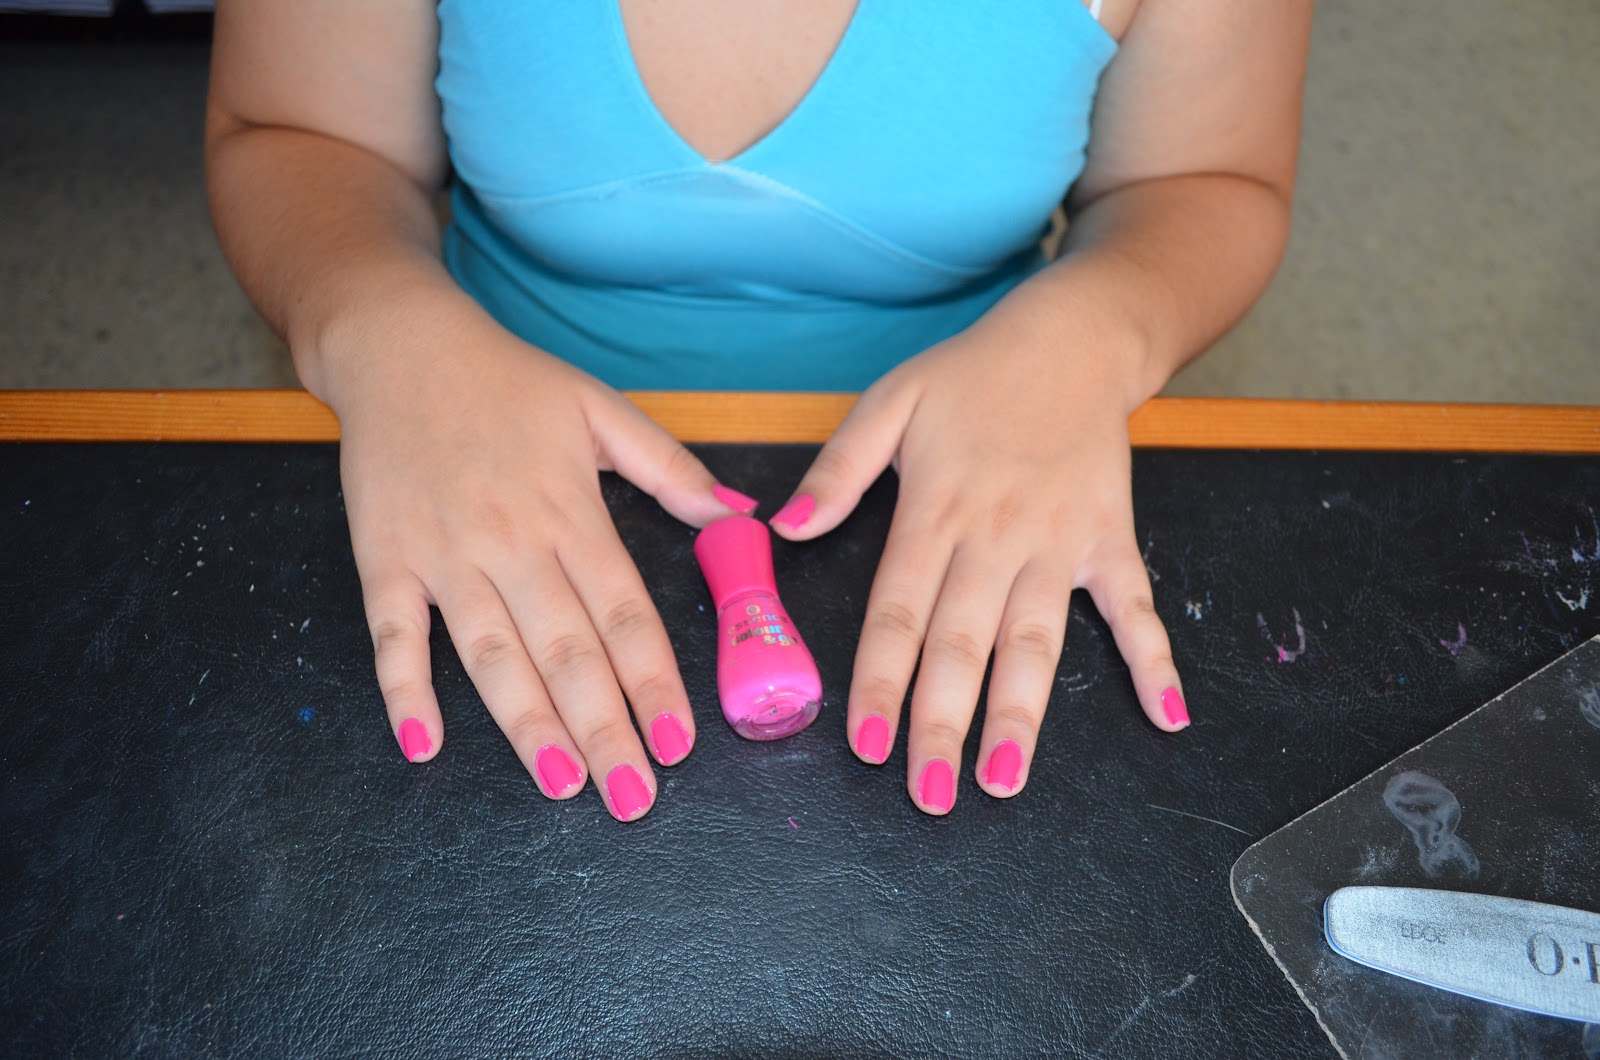
Begin by taking off any nail polish you have and filing your nails. I like to file my nails in a square shape! In order to keep your nail polish on longer file the top of your nail also as shown in the above pictures.


Apply your first coat of Pink nail polish, I have chosen the essence Colour & Go in 108 Ultimate Pink.


Apply a second coat of your nail polish and you are finished from you first phase of this look!


We will now start the Ombre/ Gradient effect which we will do with the essence Marble Mania Limited Edition Nail Kit sponge, you may use a foundation sponge also to do this.


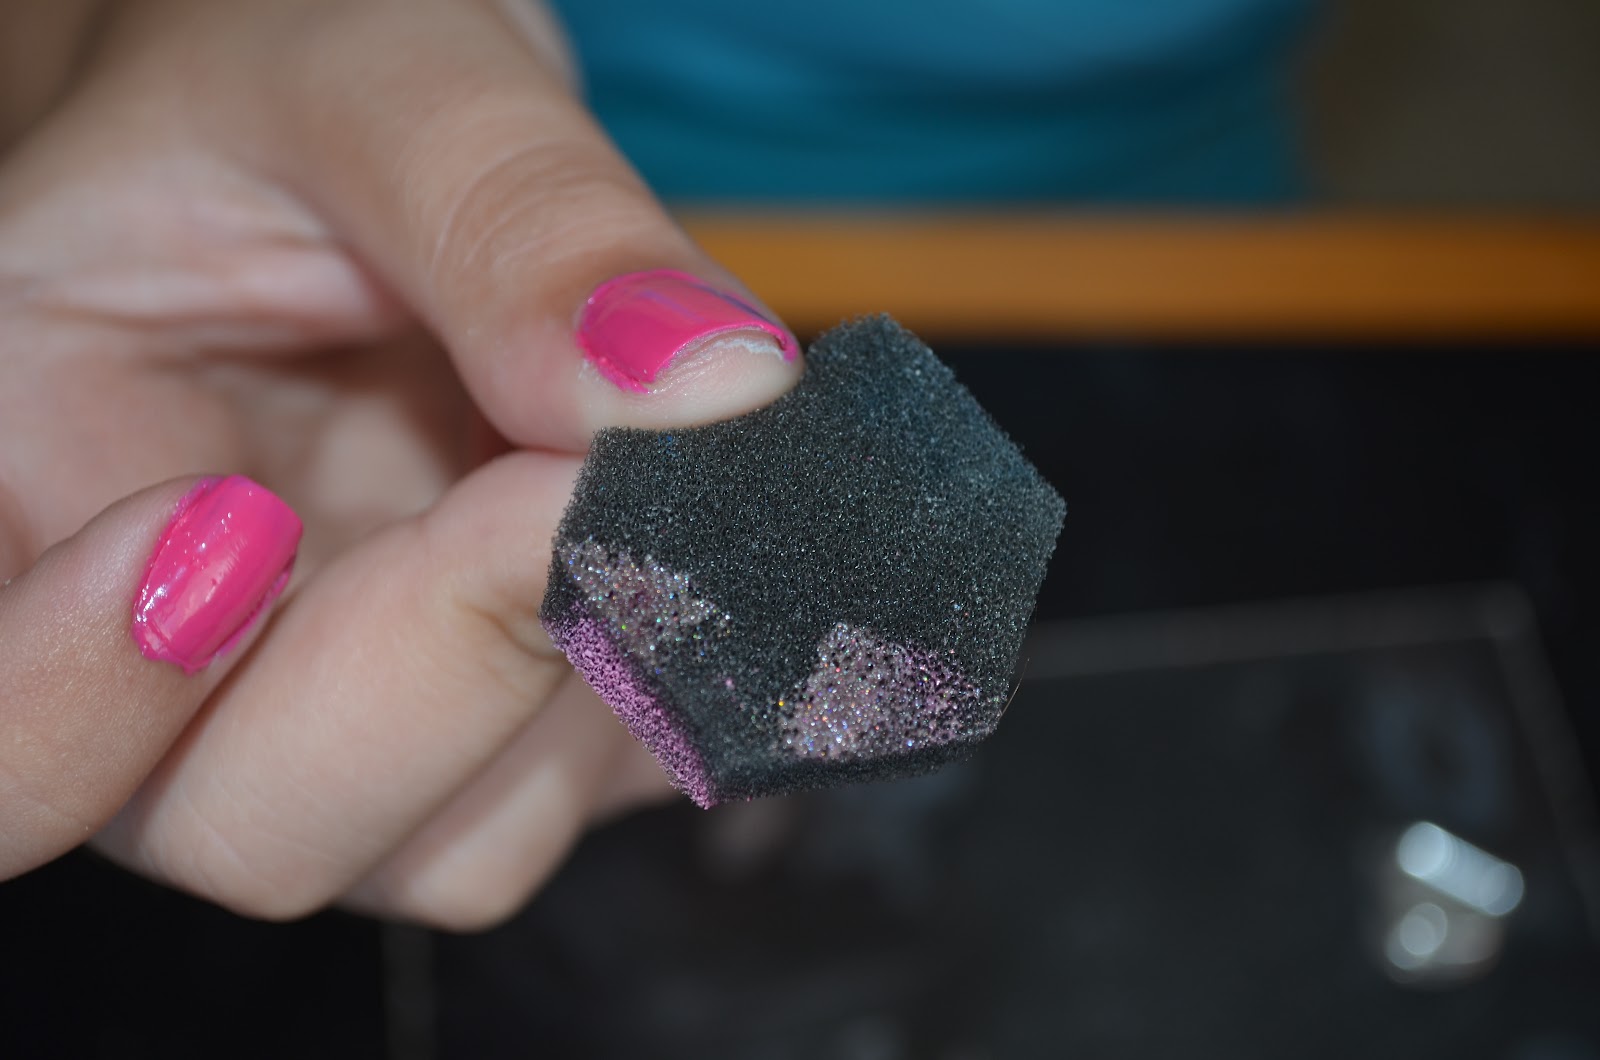
We will now use the plastic surface where we will place a little of the nail polish we will be using for sponging. In this case I am using the essence Re-Mix your style Limited edition nail polish in 01 Just can’t get enough. Grab the sponge and with its corner dab on a little nail polish on it.


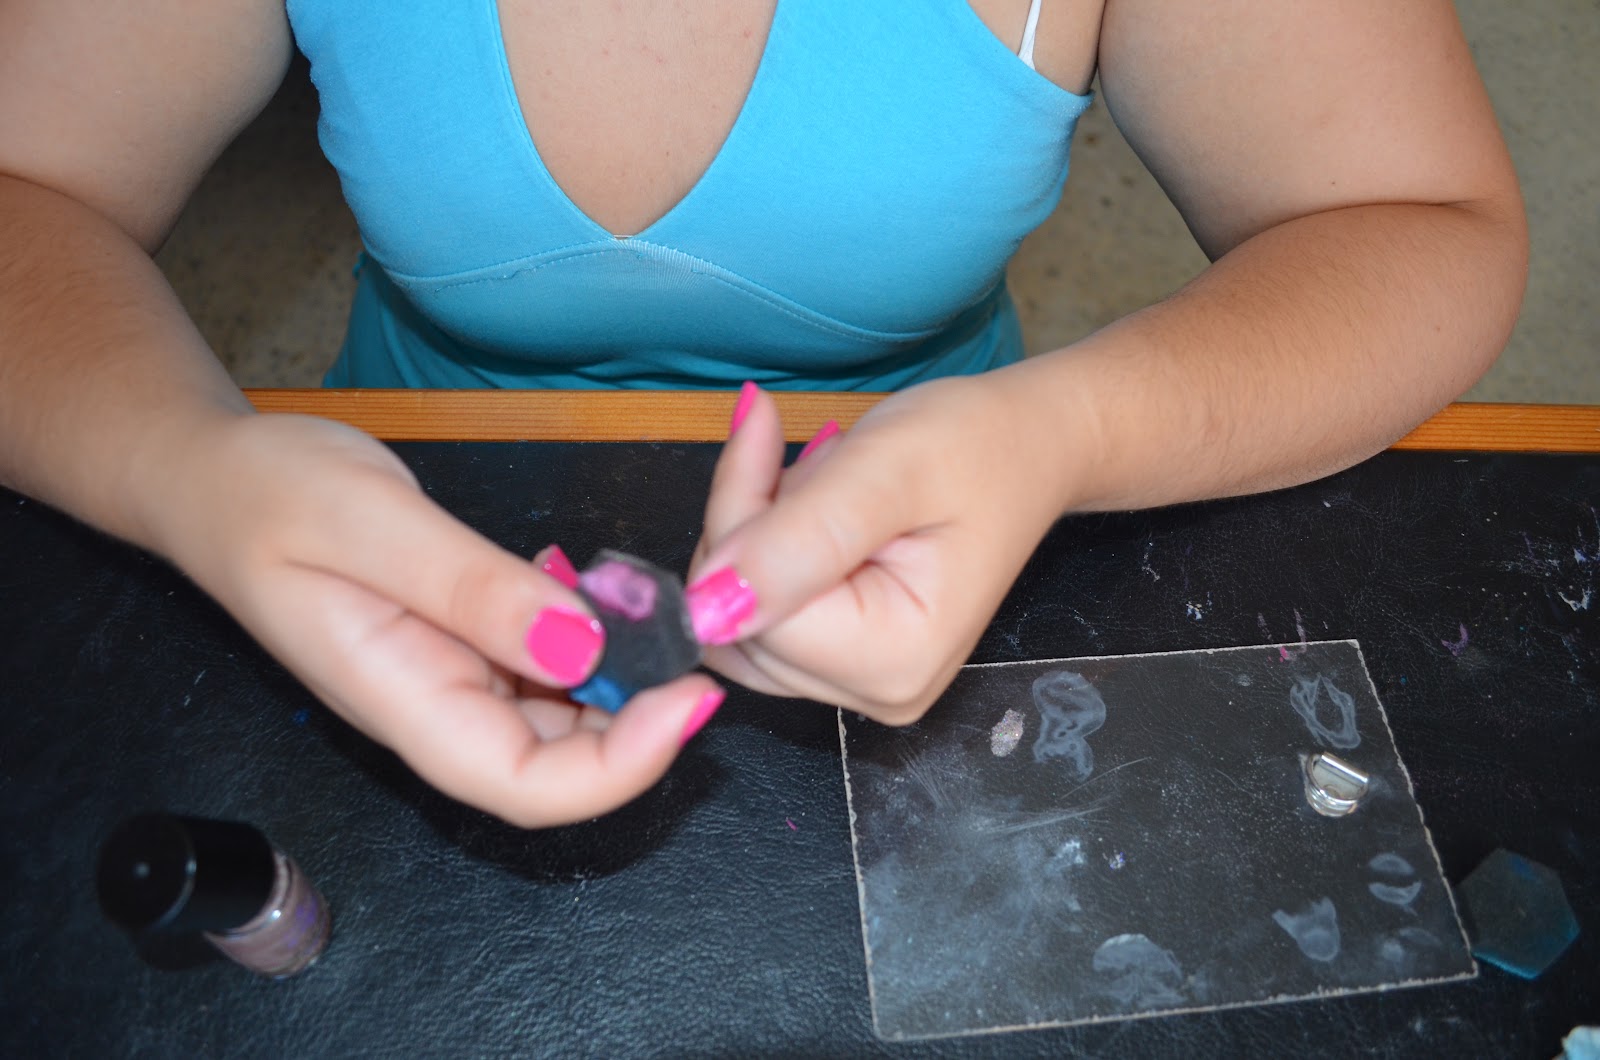
Starting from the tip of your nail, start sponging down to get the first layer of the ombre nails.


Repeat this process until you are happy with the payoff of the colour.


Next we will paint two lines on each ring finger. For this we will be using the essence Marble Mania Limited edition striper and the essence Colour & Go in 144 Black is Back.


As per the sponging technique, start by placing a little nail polish on the plastic surface. Dip the striper in the nail polish and draw two lines on the ring fingers as shown in the pictures above.


Next we will seal the deal with a top coat! I am using the Sally Hansen Diamond Shine Base and Top Coat.


Last but not least… Clean Up! Grab an ear bud and dab it in the nail polish remover and bid those “fallouts” good bye!


We hope you enjoyed this post!!

Thank you again to Jessica and Rachel for hosting us!!

If you liked this post visit us on www.allthingsfabulousblog.blogspot.com or on our facebook page on www.facebook.com/allthingsfabulousblog.

Martina & Denise

The Fabulous Team


Thursday 16 August 2012

Storage Ideas

Hi Beauties :), 

As per you suggestions through our Poll, here are some Storage Ideas. 

Earrings 

There are a lot of jewelry boxes and cases that one can use. However, personally I like my earring to be hanging and somewhere where I can see them, or else I forget what I have.


Earring Holder

I bought this earring holder from ebay for a couple of euro and it is really handy and practical. I really like it because It stores quite a lot of earrings. Speaking of which, I need to buy another one since it is becoming quite full. 

Necklaces & Bracelets 

I used to store my necklaces in a small jewel box however they would always get tangled and then I would end up always wearing the same couple of things. To solve this problem I bought a small handbag holder and attached it to the inside door of my wardrobe. This saved up a lot of space and necklaces do not get tangled anymore. 

Small Handbag Holder
 

Makeup 

I store my makeup according to what they are, for example: foundation, quads and small palettes, mascaras, eyeliners, lip glosses, and lipsticks. I use food containers which can be found at supermarkets or euro shops. 


The makeup that I use on an everyday basis I store it in a small makeup case which I found is quite handy if you are in a rush in the morning. 


Nail Polish and Perfumes 

With regards to perfumes I discard the packaging and store them all in one corner on a metal tray. I call it my “perfume corner”. This way it is easy to identify which perfume you would want to wear and also it creates somewhat of a decoration.

Small Metal Tray


The same goes for nail polishes; I store them all in one corner in basket like tray. This way everything is in order and organized. 

Basket Tray


How do you store your personal belongings?
From where do you buy your containers and organizational trays? 

Till the next post 

Take Care 

Jessica :)

Monday 13 August 2012

Benefits of Green Tea


Hello beauties, 

Green tea is made from Camellia Sinensis leaves originated in China. It is very beneficial for the human body.

Benefits of drinking green tea:

Studies have shown that green tea formulations reduce sun damage which will enhance sun protection when used in addition to a sunscreen.
Green tea is likely to slow down the development of some signs of aging since it has collagenase and elastase.
Green tea is also known as an antioxidant which accelerates weight loss by stimulating the body’s nervous system. This leads to fat being sent through the blood stream to the body cells to use as fuel.
The body is benefited with extra energy. It also releases the excess water and burns fat.

In these hot days of summer I recommend reaching for an iced green tea since it is the most refreshing way to cool off in summer. It is recommended to drink at least 3 cups or more per day to enjoy the health giving properties of green tea.


Green tea treatment:

In order to make this treatment you will need:
  • Ice cube tray,
  • Green tea,
  • Hot water.
  • Lemon juice (optional)

Add 1 to 2 green tea bags (it depends on how much you'd like your tea to be concentrated) to the hot water along with a teaspoon of lemon juice (optional) and stir, until the water cools down to room temperature. Pour the mixture in the ice cube tray and let them freeze for about 24hrs.


First wash your face with a cleanser using warm water in order to open up the pores, then grab an icecube, using it as a toner and rubbing it all over your face until it all melts. Afterwards, wash your face with cold water to close your pores and add your favourite moisturizer. The green tea ice cubes will calm the irritation from a pimple or reduce the appearance of large pores, de-puff any under-eye bags and face altogether.


Take Care,

Rachel 
xoxo


Wednesday 8 August 2012

How to control/reduce under eye circles


Hello Beauties:)

As requested by one of our followers, here is how to control or reduce persistent under eye circles.

We all suffer from under eye circles from time to time and they are not a pretty sight. These may be caused by several factors. 

One of the main causes is lack of sleep. Lack of adequate sleep can cause one’s skin to appear paler, therefore increasing the appearance of darkness under the eyes, and also it reduces circulation. If you suffer from insomnia, I would recommend applying an eye crème in the evening before bed and in the morning when you wake up. Make sure that the eye crème that you choose contains Vitamin K and Retinol since these significantly reduce puffiness and discoloration. The eye crème that I use is Nutriganics smoothing eye crème by The Body Shop. I like this product because it is an organic type of product since 99% of the total ingredients are from natural origin. Also, I like how it reduced the puffiness around my eyes and it also reduces the appearance of the first lines and wrinkles. 


Another cause is an unhealthy diet and lifestyle, which is the cause of many ailments in our body. By eating a healthy balanced diet and take the necessary vitamins and the right amount of water, under eye circles should be reduced. Eat plenty of fruits and vegetables, especially spinach and cabbage since these have a lot of necessary vitamins. Also, take a vitamin supplement if necessary. 

Smoking does not do your eyes and skin any favors. Smoking causes vascular problems that not only threaten your life but also make your blood vessels appear more prominent and bluer. 

Under eye circles may be the result of an allergic reaction. The most frequently occurred allergies are to, for example pasteurized milk from hormone- treated cows, processed grains, fruits and veggies with residual pesticides and other products that people had never eaten until just several generations ago. Allergies can also be caused by mascaras. Personally, my eyes experience an allergic reaction to water proof mascaras and become blood shot and puffy. 

Natural Remedies

1  1)    Use Cucumbers:- Cucumber slices have long been used to reduce puffiness and refresh the appearance of skin around the eyes. Place a slice over each eye, extending over the darkened area. Do this three times a week coupled with lying down for 10-15 minutes.

2  2)    Apply cool tea bags or an ice cube wrapped in a soft cloth:- The ingredient of Tannin in tea bags reduces swelling and discoloration. Lie down, preferable in the morning, and leave the cool and damp tea bags over your eyes for about 10-15 minutes.


3  3)    Drink green tea:- Green tea is a natural anti oxidant. It is very beneficial for one’s general healthy lifestyle and also to reduce and control under eye circles. 


4  4)  Use a frozen spoon:- Put a spoon in the freezer for 10-15 minutes. Take it out and cover your eyes with it. Hold it there until the spoon is warm again. 


Extra Tips
  • Be gentle to your under- eye skin, as this is the most delicate skin on your body
  • Avoid rubbing your eyes. The rubbing irritates the skin and can break capillaries underneath, causing both puffiness and discoloration.
  • Wear dark sunglasses to protect your eyes.
  • Drink water
  •  Do not drink too many fluids before bedtime. This can contribute or add to bags under your eyes.

I hope this post was helpful

Until next time

Take Care

Jessica :)

Sources:- 

http://www.wikihow.com/Get-Rid-of-Black-Circles-Under-Your-Eyes
http://allwomenstalk.com/five-tips-on-how-to-get-rid-of-under-eye-dark-circles-and-puffiness/2/
http://www.totalbeauty.com/content/article/how-to-reduce-under-eye-circles

OOTN:- Outfit Of The Night

Hello Beauties,

This evening, Rachel and I had the first ever Beauty is our Passion Blog meeting :) There are a lot of blog posts planned for the coming weeks so stay tuned.


For our first meeting I decided to dress up :) This is the outfit that I wore:


I really love this dress!! First of all, I love its bold fuchsia color and also that it has a Hi-Low hem line. I am obsessed with this trend at the moment. It is somewhat form fitting at the top with its ruxing detail. I paired this dress with casual wedges and also with a small hand bag that I both bought at Shana Outlet B'Kara. For accessories I opted to wear only a pair of pink dangly earings, since I taught that they were somewhat of a statement piece.


For my hair, I decided to experiment a bit and came up with a messy bun which at the same time it gave the dress a more put together look.


If you want a hair tutorial for this up do please leave a request in the comments below or comment on our Facebook page. 

Hope you like this post,

Till next time,

Take Care

Jessica :)

Monday 6 August 2012

Review: Montagne Jeunesse Chocolate Infusion Intense Conditioning Hair Treatment


Hi Beauties :)

Today, I will be reviewing another Holy GraiI hair item. I use this treament with my 
Joico Smooth Cure shampoo, using it as a deep conditioner when I heat style my hair during the weekend or special occasions since my hair is not easy to manage and style. The product is not runny so you can apply it to your hair without it dripping everywhere. I tend to leave the roots uncoated and concentrate more on the ends combing it through with a wide wood comb to prevent breakage. Although I have oily hair I make sure to deep condition it at least once a week so, this will act as conditioner and a treatment in 1. I recommend leaving the mask for at least 5 minutes, this will make sure that the product is soaked into the hair cuticle. It always leaves my hair softer, shinier and sleeker. It has a delicious chocolate scent which lingers during the day. Like most of my hair products, Montagne Jeunesse does not add harmful chemicals, do not test on animals and is suitable for vegetarians.
The only cons I found were that Montagne Jeanusse products are very limited in Malta. I searched everywhere, (browsed all pharmacies in Valletta and couldn't find these masks except Lyzette, which stock 5 every fortnight). A single sachet which contains 10ml is priced at 1.50euros which is reasonably priced. I also would like Montagne Jeunesse to make this product in a bigger container since a single sachet has only one use.

http://www.montagnejeunesse.com/


Nonetheless, I still highly recommend this product.

I made some research about Kukui Oil. Here's what I found:
Kukui nut oil has been used for many years throughout the islands of Hawaii. It is used to moisturize and protect the skin and hair from sun, salt, wind and other environmental elements. This oil penetrates the skinand hair easily and leaves it silky and smooth. Kukui oil contains vitamins A, C, and E. Kukui nut oil can be used as a treatment for an itchy scalp or dandruff. It has the same regenerative effects on the hair and scalp as it does for the skin.

Take Care,
Rachel
xoxo 


Thursday 2 August 2012

July Favorites


Hello Beauties :)

Here are my July Favorites. There are a few products that I like; however there are 5 products which have exceeded my expectations. 


The first product is Essence Gel liner in the color Berlin Rocks 03. First and foremost I love the color since it suits my eye color and also I prefer it from straight up Black. The color is a purple color with very tiny shimmers throughout. It has a very creamy consistency and it is highly pigmented. I was also impressed because it stayed on all day and it did not smudge at all. I really like this product and I would recommend it to anyone. 

Essence Gel Liner: Berlin Rocks


ELF Angled Eyeliner Brush
I apply this Gel Liner with ELF angled eyeliner brush. It is a very precise brush therefore you can apply it as thick or thin as you want. Also the price beats them all, a quality brush for only 3 sterling J. I think that this brush and the gel liner make the perfect pair. 


The next product is Maybelline Colossal Volume Express Mascara. This is one of the best mascaras that I have tried so far. Its formula is perfect for elongating the lashes and building up volume. Also the brush is neither too large and neither too thin therefore it can reach even the smallest of lashes.

Maybelline Colossal Volume Express Mascara


Another Maybelline product is the Maybelline Color Tattoo in the color Turquoise Forever. The first thing that caught my eye is the intensity of the color. Personally I love blues and this product’s color is perfect. It has quite a creamy consistency and it applies evenly without tugging your eyelids. It also lasts quite a long period of time and it is perfect as a base for the eye shadow. 

Maybelline Color Tattoo: Turquoise Forever

The last product is a hair product and it is CHI Silk Infusion. I apply this product at the ends of my hair while it is still damp, before blow drying it. It is a very good heat protecting product and it leaves your hair shiny and silky. I have the smallest bottle of this product and it is not a cheap product however this small bottle has lasted me more than a year, since only a pea size amount goes a long way. 

CHI Silk Infusion
 Hope you liked this blog post.

Take Care :)

Jessica